Compatibility mode in Excel
Compatibility mode is a viewing mode for the Excel files. An Excel document in compatibility mode is viewable by everyone in all versions of Excel (older and newer). There are several versions of Excel released till now. The document created in the newer version may not be compatible with the older release of Excel. It depends on the data stored in that Excel workbook.
For example, a feature implemented in Excel 2016 is not compatible enough in Excel 2013 and would not display data properly.
This chapter contains all the essential information for the compatibility mode along with the example using screenshots to step by step explanation.
Compatibility issue
An Excel file runs in compatibility mode after you save it in an older format of Excel. You can also face this compatibility issue if your Excel software has been upgraded to the newer version of Excel. But the files that you have created are not upgraded.
You can run the compatibility checker to find which features and functionality are not available in the previously created file for the upgraded software. Thus, you can resolve it before sharing it with other users.
Properties of compatibility mode for Excel file
- If an Excel file is in compatibility mode, you can use any new feature or functionality that a newer version of Excel provides.
- If you want to use all the features of Excel, you have to convert the file from compatibility mode to normal mode by changing the Excel file format to the current application version.
Save a document in compatibility mode
Excel allows its users to save the document in compatibility mode. Compatibility mode applies to a file when you save a document for the older version of Excel. You can enter to compatibility mode when a document is created, especially for it.
To save an Excel document in compatibility mode, follow the steps below:
Step 1: Create a document to learn how to save in compatibility mode.
Step 2: Go to the File and then click Save as option.
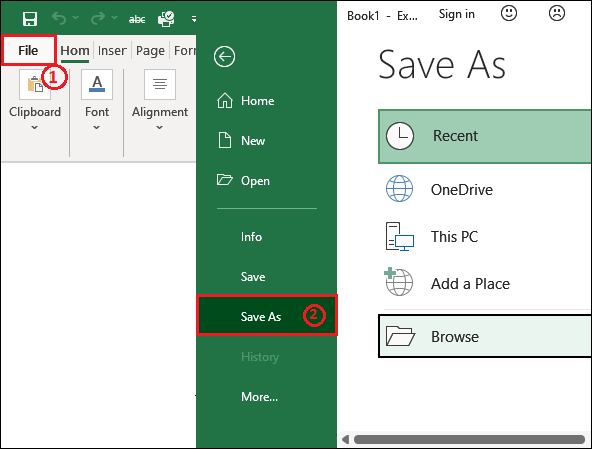
The default format to save the Excel file is .xlsx if you simply save the file.
Step 3: Choose a folder on your computer to save this Excel file.
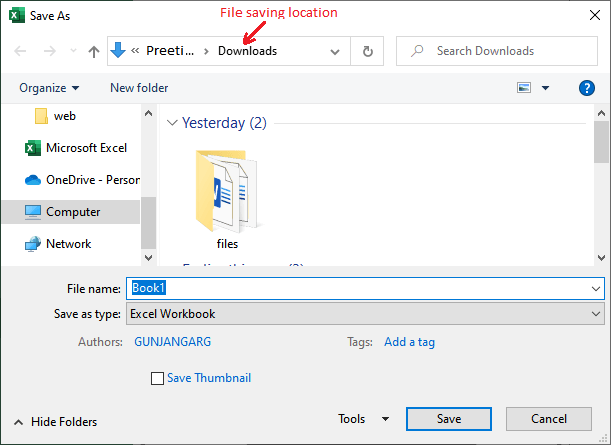
The next step is to choose an older version format (.xls) of Excel to save the file in compatibility mode.
Step 4: Click the Save as type dropdown list and choose Excel 97-2003 Workbook file format from the dropdown list.

Step 5: Provide the name of this file and click the Save button.
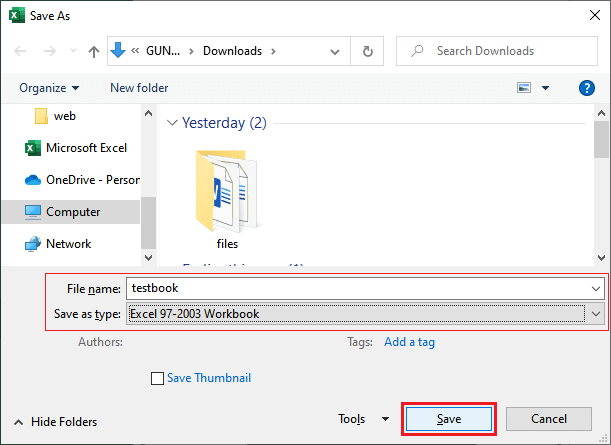
This Excel file is successfully saved in compatibility mode.
Check if document is in compatibility mode
An Excel file runs in compatibility mode after you save it in an older format of Excel. The Excel users can easily find if an Excel document is in compatibility mode for their Excel software. The document name at the top of the Excel file will look like this: filename.xls [Compatibility Mode] when you will open an Excel file.
See that the below document is in compatibility mode, whose name is shown as testbook [Compatibility Mode] – Excel.
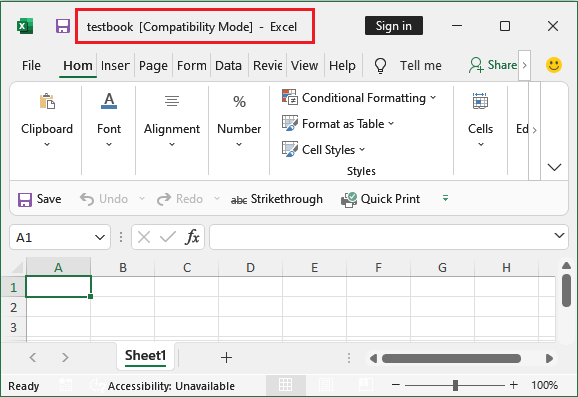
This was the document that we had created in previous steps.
Find the compatibility mode of Excel document
Suppose you receive an Excel document from someone else, you would not be aware of the version of Excel in which it has been created. By just seeing an Excel document, a user cannot find that which compatibility mode an Excel document is using. Excel offers a compatibility checker to check the compatibility mode of the document.
Run this compatibility checker to check what compatibility mode is used by the document you have opened. It is helpful when you receive a document from someone else.
Follow the steps to find the compatibility mode of an Excel document:
Step 1: First of all, open the Excel document that is already in compatibility mode. We have this document that is already in compatibility mode.

Step 2: Now, click on the File option and then click the Info tab at the left of the Excel backscreen.

Step 3: Click the Check for Issues dropdown button and then select the Choose compatibility option from that list.
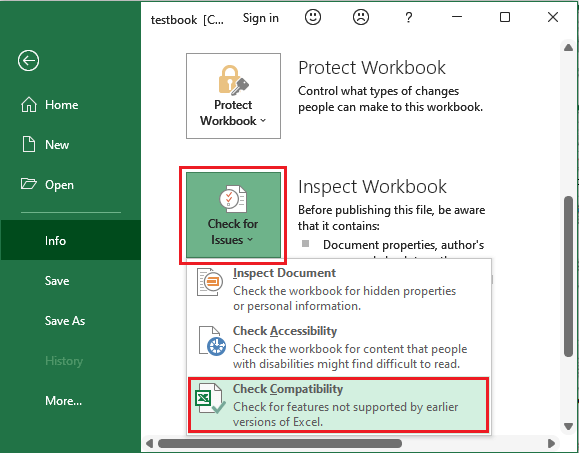
Step 4: You will get back to your document, where either convert your document in earlier version of Excel or use in the same format.
See the compatibility mode that you are using for this document now.
Leave the compatibility mode of Excel document
When an Excel document is in compatibility mode, you might not be able to access all the functionality of your Excel in that workbook. So, to make the workbook fully functional, you can leave the compatibility mode to normal mode. This will help the users to get the fully functional and accessible Excel file.
You should be aware with the following point before leaving the compatibility mode:
- The user can leave the compatibility mode or you can say that convert the file from compatibility mode to normal mode.
- By leaving from the compatibility mode, you can get all the features enabled for your file according to the current version of Excel.
- After conversion, the original workbook will be deleted cannot be restored back.
Do not convert the document from compatibility mode if any other user is also working with that workbook in an older Excel version. Once the user leaves the compatibility mode, it will permanently change to the normal mode. Hence, Excel will also issue a warning regarding this that the document might look different after conversion.
Following are the steps to leave the compatibility mode:
Step 1: Open the targeted compatibility mode Excel file. My targeted Excel file is in compatibility mode.
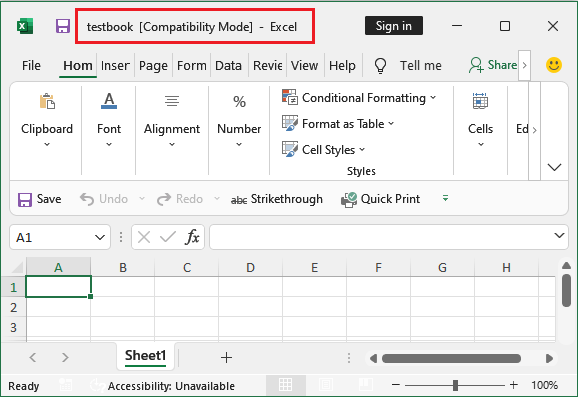
Step 2: Now, just go to the File tab and click the Info at the left side of the Excel backscreen.

Step 3: Click the Convert Compatibility Mode button to change the file to normal mode temporarily.
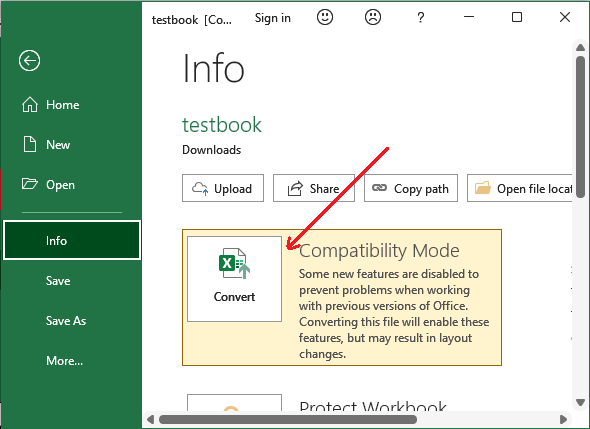
Step 4: Click the OK without doing anything on this popup, and your file will leave the compatibility mode.

Step 5: Excel will display you a popup message that your file is successfully changed to the current file format. Click Yes to reopen the workbook to get the enhanced feature.

Step 6: You can also see that the Compatibility Mode has been removed from file name. It can now run in a newer version of Excel with all functionality.
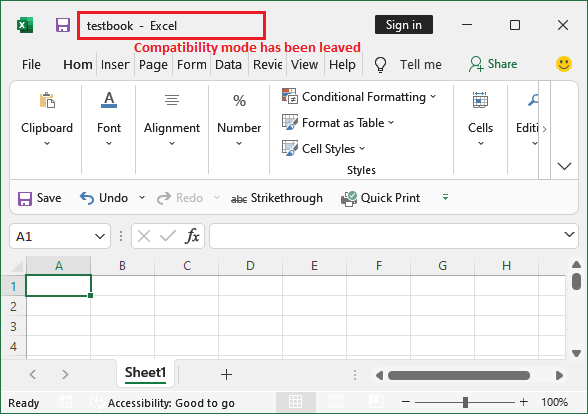
One can leave the compatibility mode works by following these steps.
Turn off the compatibility mode
Sometimes, users face a new issue that all the Excel documents are opening in compatibility mode. However, they do not have all files designed for an older version of Excel. This type of issue can occur because of the default setting of Excel that may set to use the workbook in compatibility mode being an older version.
If you are also facing this type of issue, don’t worry, this issue can be resolved. We will brief you step by step:
Step 1: Open MS Excel or open an existing Excel document.
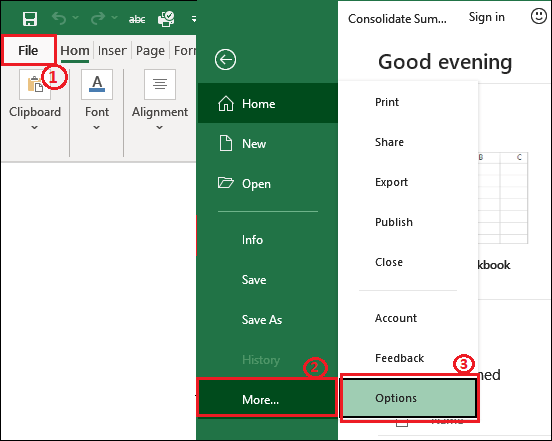
Step 2: Click the File menu and navigate to the More… and then Options option on the left side of the Excel backscreen.
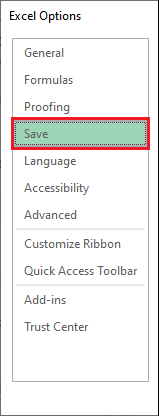
Step 3: An Excel Options window panel will open, where go to the Save tab on this panel.
Step 4: Click on the dropdown button next to the Save files in this format and choose Excel workbook (.xlsx) format from the list.
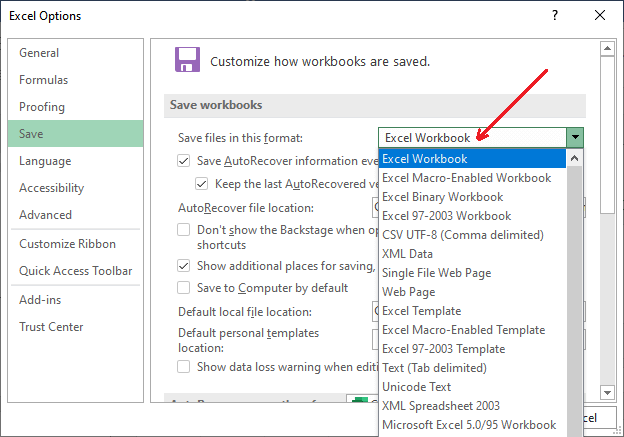
Step 5: In the end, hit OK to save this change.

Your file will now open normally in the current version of Excel.


