How to remove comma in Excel?
A comma is the most commonly used operator in Excel while working with numbers and strings. It is commonly used when you work with numbers and strings (text) in Excel. In a text string, a comma works as a separator to separate the values of the same category. Similarly, when we use a comma in numbers, it becomes more readable and easily understandable, e.g., 73,345. The use of a comma makes the data more readable and easier to understand.
Common uses of a comma in Excel
- Comma uses in Numbers – 10,000 is more readable than 10000.
- Comma uses with text data – Monday, Tuesday, Friday.
Sometimes, you have a requirement to remove the comma from the data present in your Excel spreadsheet. Here, you will learn how to remove the comma from Excel sheet data in this chapter. You can remove all commas in an Excel file or specific instance.
We will explain you four different methods to remove the comma from your Excel data.
Methods to remove comma
Both number and text string require a separate method to remove the comma from the Excel sheet. So, here we have different methods to resolve this issue.
- Remove comma from the text string
- Using SUBSTITUTE formula
- Using simple Find and Replace method
- Remove comma from numbers
- Using NUMBERVALUE function
- Using number formatting method
We will brief each of these methods in detail in this chapter.
Remove a comma from the text string
A comma is an essential part of formatting and it makes the text readable and clear. Generally, we use a comma in the string to separate similar text data by a comma. When a comma is used in string to separate the different values, it becomes clear to the users.
For Example – Monday, Tuesday, Friday
Sometimes, the user needs to remove this comma from the text string. It is very easy to remove a comma from the text string in an Excel sheet. Here, we have two methods to remove the comma from text strings in an Excel spreadsheet.
- Using SUBSTITUTE formula
- Using simple Find and Replace method
You will discuss both of them with the help of an example step by step.
Method 1: Using SUBSTITUTE formula
Excel provides a SUBSTITUTE formula that enables the users to remove the comma from the text string. Using this SUBSTITUTE formula, you can substitute the comma with a blank/empty character or any character you want.
However, this way is a bit calculative to remove the comma from the text string. Still, it saves a lot of time for the user by removing comma using formulas instead of manually. It has more control on Excel cells than Find & Replace method.
SUBSTITUTE syntax
- Here, A2 indicates to the second cell of the first column or you can also understand it as the second row of column A.
- Two commas have used in this formula because we have data separated into three parts by two commas.
- Blank and empty space refers to the place that nothing between data after removing the comma.
Let’s learn with an example.
For Example
We have an Excel sheet containing some data (Name, Age, and Profession) separated by a comma. Now, we will replace the comma from these figures.
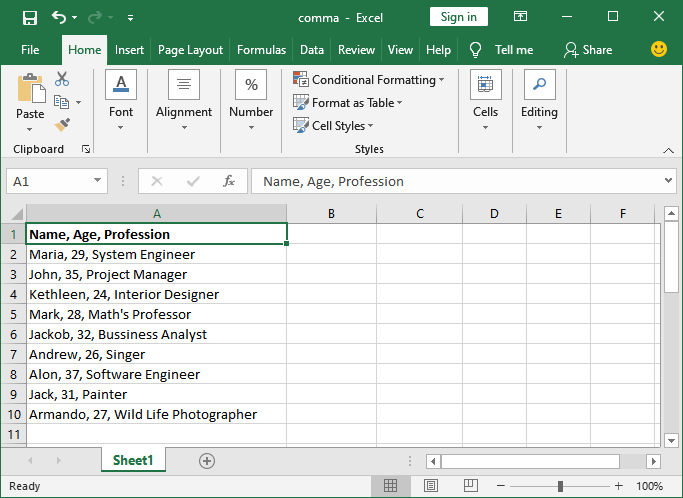
Step 1: Create or open an Excel spreadsheet from which you would like to remove the comma.
On this spreadsheet, firstly select the cell where you want to paste the result after removing the comma and then go to the Formula bar where a formula executes.
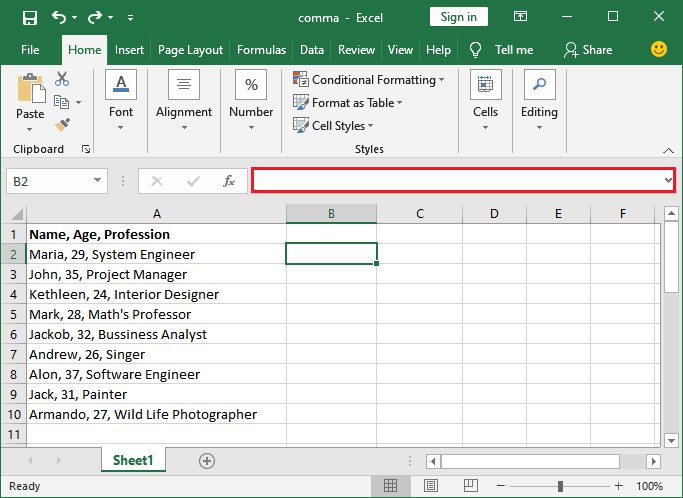
Step 2: In the formula bar, copy and paste the following SUBSTITUTE formula to remove the comma from the first cell data and press Enter to automatically place the newly created data in the selected cell.
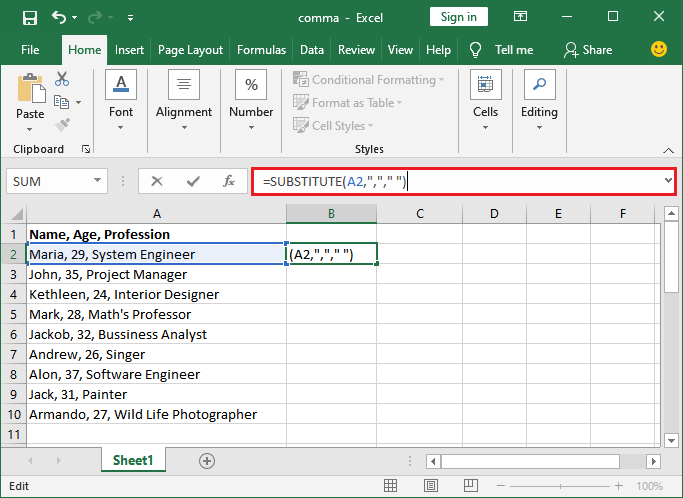
Press Enter after using this formula and see that all the commas from the A2 cell will be removed immediately and modified data pasted into the selected cell.
Step 3: See the result for the previously executed step. Here, you can see that we get the comma-free cell data after using this formula.
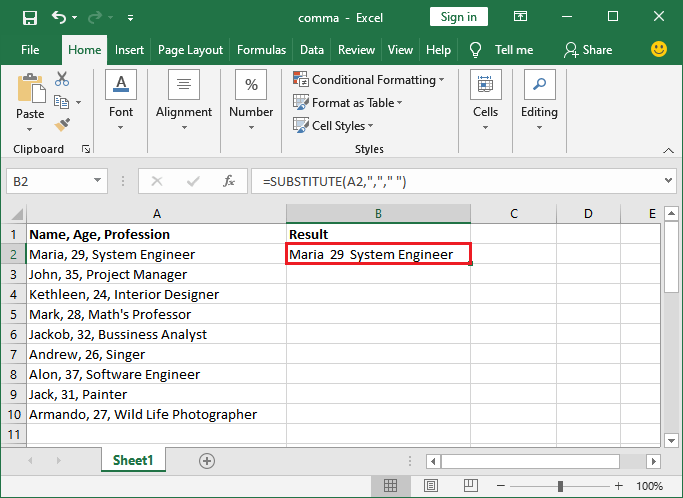
Step 4: Similarly, use this SUBSTITUTE formula to remove the comma for another cell data and just press Enter key. You have just to change the cell number accordingly from which respective cell you want to remove the comma.
For Example – for A4 cell
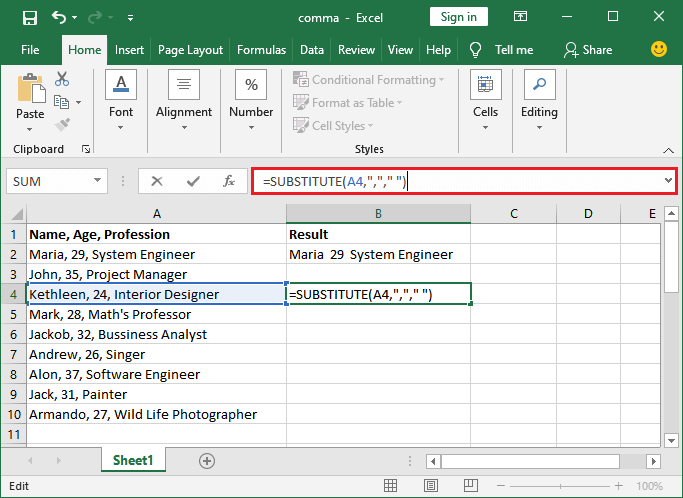
Do not forget to select the cell where you want to paste new modified data.
Step 5: You can see that another cell data has been modified successfully.
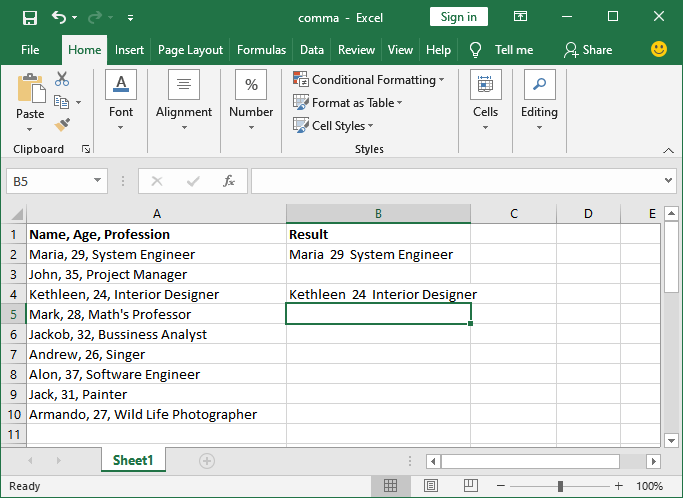
Similarly, the same process can be done with another cell data of this Excel sheet by changing the cell number.
Drawback
The SUBSTITUTE function is helpful only when you want to remove the comma from a specific cell data. It works efficiently for a particular cell, but it does not work well when you need to remove all commas from the Excel sheet.
Therefore, we will suggest you to use another method (Find & Replace method) to extract all commas from the string in an Excel spreadsheet at once.
Method 2: Using Find and Replace method
The Find and Replace method is one of the easiest ways to replace or remove anything from your file except comma from number. It works in Excel and can also be used in Word, PowerPoint to replace any value.
You can use this Find and Replace method to remove the comma by replacing the comma with nothing (empty value). Let’s take an example and understand it much better.
For Example
We have an Excel sheet containing some data or values in it. Now, we will replace the comma with no value. Thereby this method will remove the comma from the file.
Step 1: Open the Excel spreadsheet from which you would like to remove the comma.
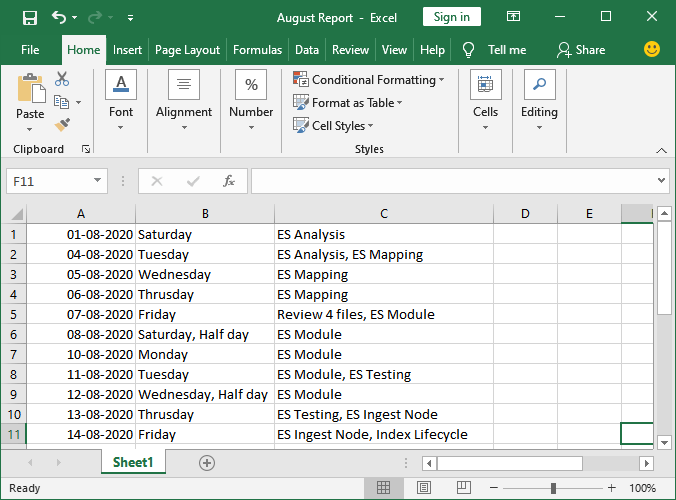
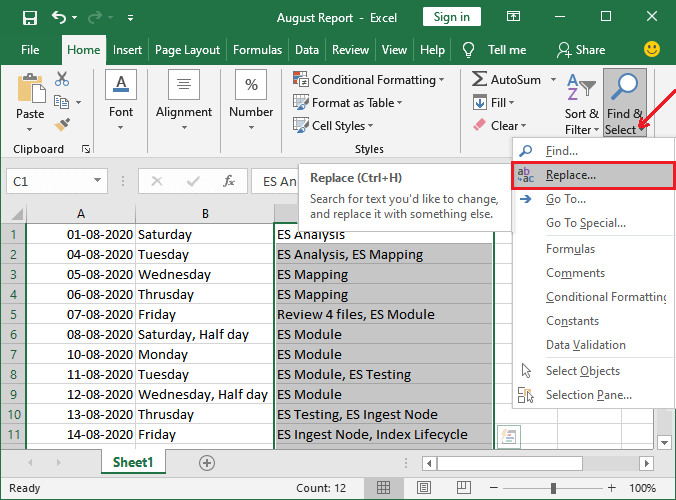
Step 2: Select the cells or column from which you want to the remove comma. Inside the Home tab, go to the Editing section and click on Find & Select dropdown button.
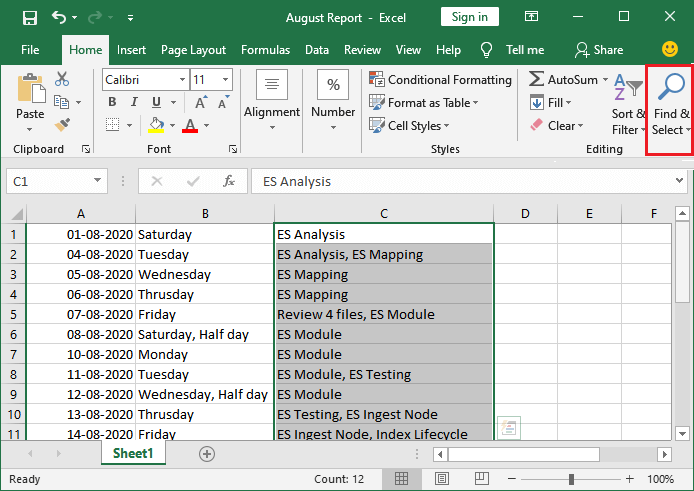
Step 3: Select the Replace option from the Find & Select button.
Step 4: A small Find & Replace dialog box will open and show you. Here, put the comma (,) in Find What field value and leave the Replace With field empty.
In the end, either click on the Replace All button to remove all comma from the selected column data.
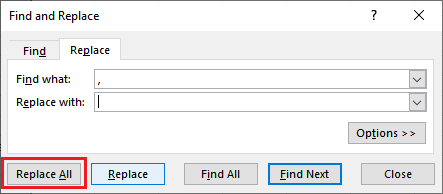
Although you can either click on the Replace or Replace All button here as needed.
Note: If you want to remove all comma from the column at once, click on the Replace All button. Else click on Replace to remove the comma one by one.
Step 5: Now, you can see that all the commas from this column have been removed successfully. There is no cell data available having a comma in this column.
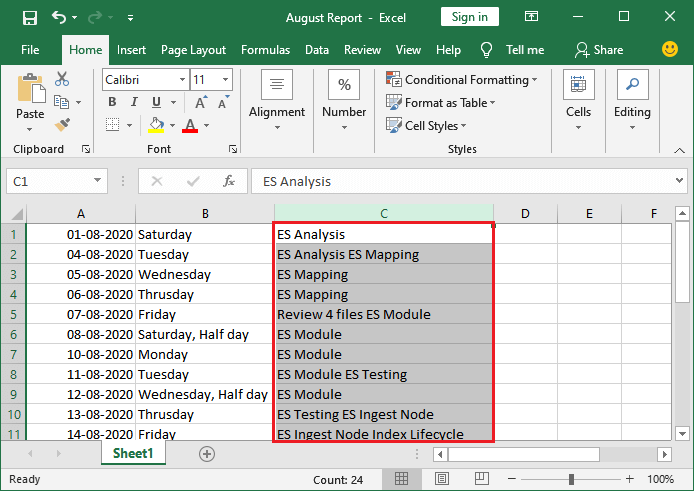
Similarly, you can remove all commas from the string texts in an Excel sheet, but the same method will not work with numbers. You have to use another method for numbers.
Remember that the Find and Replace method does not work with numbers to remove a comma from an Excel spreadsheet. So, we will use another method for numbers.
Remove commas from numbers
A comma is an essential part of formatting and makes the data readable, e.g., – 73,345. Removing comma from number means removing the number formatting. For Example – 2, 56, 395 is more readable than 256395.
We have two methods to remove the comma from numbers in an Excel sheet.
- Using number formatting method
- Using NUMBERVALUE function
You will discuss both of them with the help of an example step by step.
Method 1: Using number formatting method
A comma is an essential part of formatting and make the data readable. So, we have to update the number formatting to remove the comma from the numbers. Now, you will see how one can remove all commas from numbers.
With the help of an example, we will brief you on how easily one can replace the comma between number values without using any mathematical formula. Use this method to replace comma between numbers by replacing the comma with nothing (empty value). Let’s take an example and understand it much better.
For Example
We have an Excel sheet containing the yearly report of sell and expenses, as shown below. We will remove all commas present between numbers in this Excel spreadsheet.
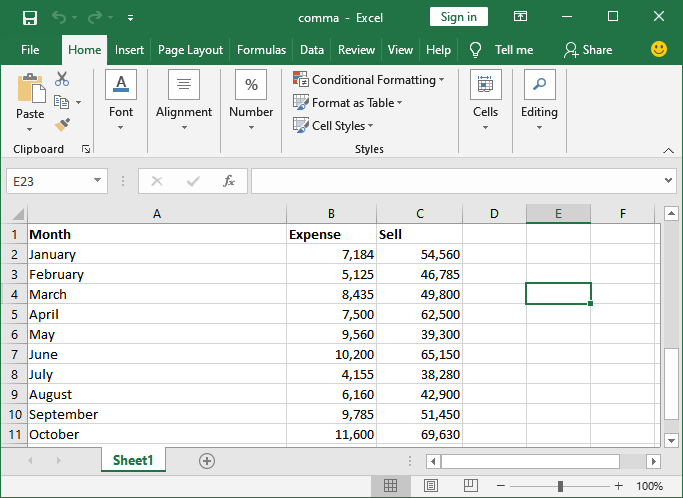
Step 1: Select the complete data or specific cells/column in an Excel spreadsheet from which you want to remove the comma.
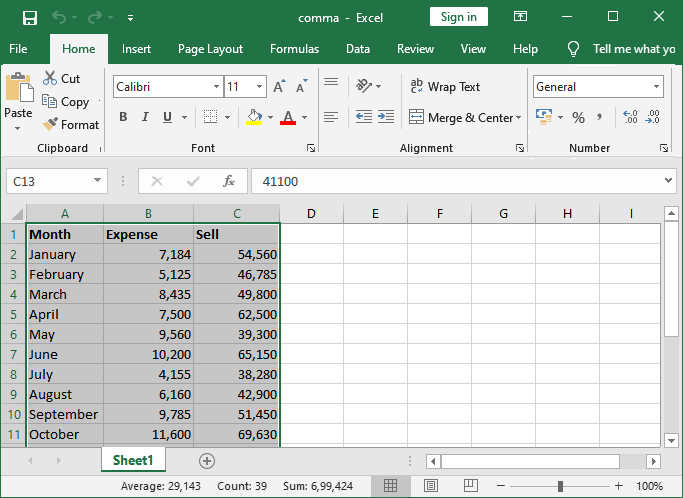
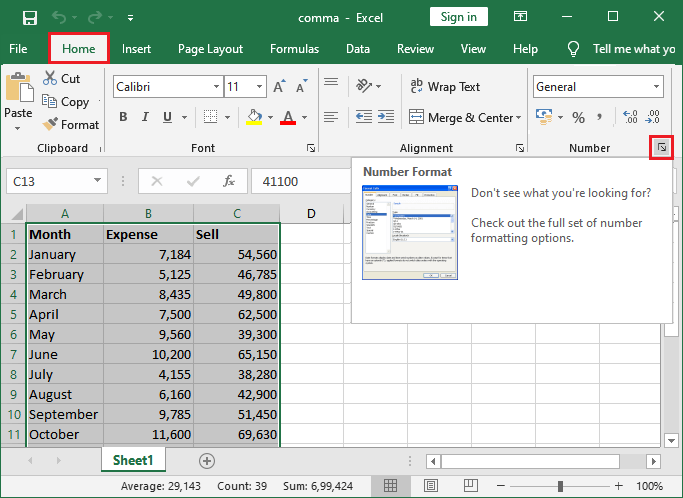
Step 2: Inside the Home tab, go to the Numbers section. At the bottom of this Number formatting group section, click on the dialogue box launcher (a small icon with a slanted arrow shown in the below screenshot).
Home > Number (formatting section) > dialogue box launcher icon
Step 3: A format cells dialog box will open and show you, where click on Number in this category list at the left panel of the dialog box.

Step 4: Here, unmark the checkbox “Use 1000 Separator (,)” and specify how many decimal digits you want in the Decimal places field, e.g., 2. (By default, it is 2.)
You have to set the Decimal places field value to 0 to remove the comma and Click the OK button below.
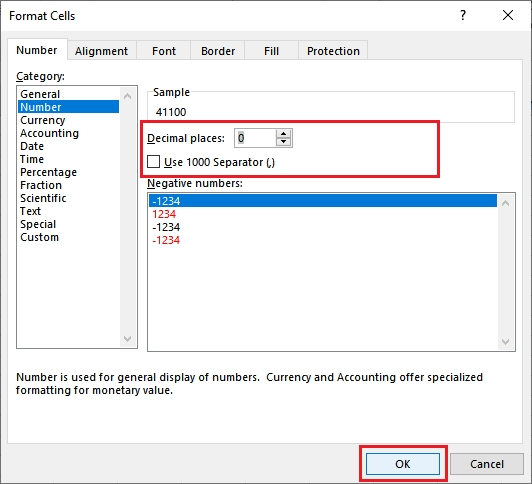
After completing this step, all commas from the file will be removed automatically.
Step 5: In the below screenshot, you can see that all commas have been removed successfully.
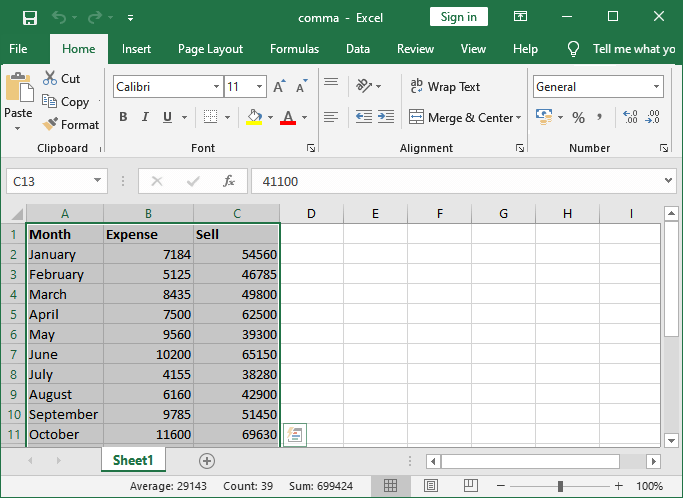
Tip: You can press CTRL + 1 shortcut key to open the number formatting directly. It will directly take you to the Format cells window by selecting all your Excel spreadsheet data.
Method 1: Using NUMBERVALUE function
In Excel, we have one more method to remove the comma from the number. It is a bit calculative method and implemented differently than the previous one. Often, you have a situation where a number is not actually a number, but it is text. You can use the NUMBERVALUE function to remove the comma from it.
Remember that this NUMBERVALUE function actually converts the text to number.
Drawback
This function is helpful only when you want to remove the comma from a specific cell data. It works efficiently for a particular cell, but it does not work well when you need to remove all commas from the Excel sheet.
NUMBERVALUE syntax
- Here, C2 refers to the second cell of the third column or can also understand it as the second row of column C.
Let’s understand with the help of an example how this function works for us to remove a comma from the numbers. For this, we have a dataset in an Excel spreadsheet.
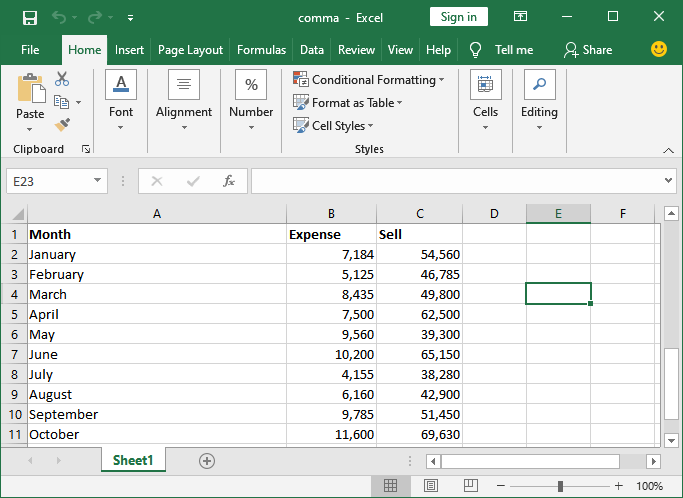
We will remove all commas present in the Expense and Sell column from this Excel spreadsheet using the NUMBERVALUE formula.
Step 1: On this spreadsheet, firstly select a specific cell in the Excel spreadsheet to paste new modified data (result) after removing the comma. Then go to the Formula bar where a formula executes.
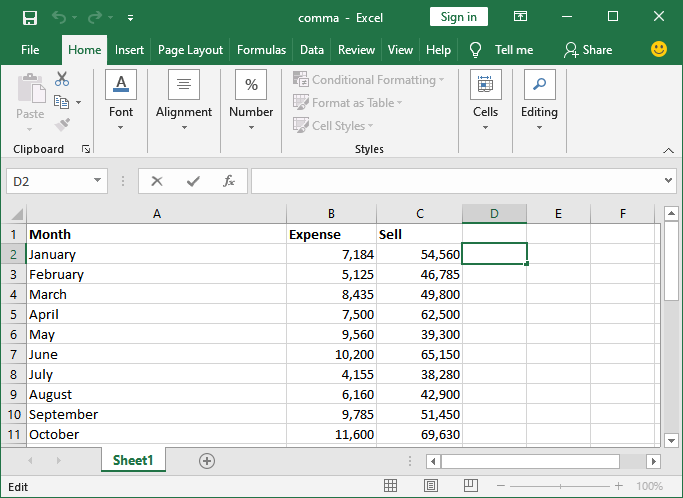
Step 2: In the formula bar, copy and paste the following NUMBERVALUE formula to remove the comma for C2 cell data. Then, press Enter to place the newly created data in selected cell automatically.
It will automatically point to the C2 cell in the Excel sheet.
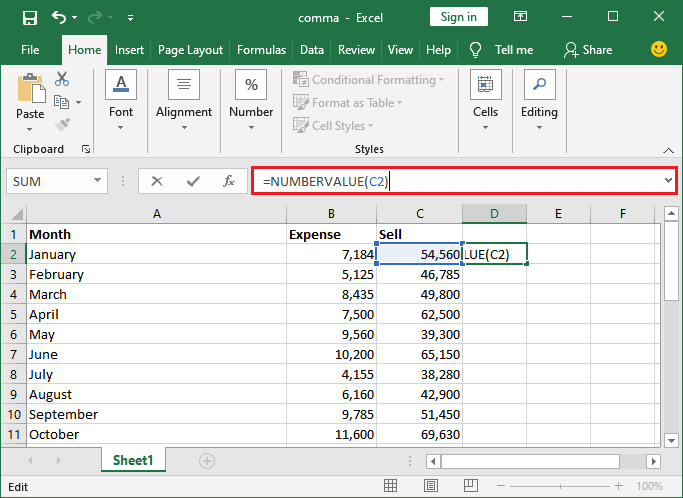
Press Enter after using this formula and see that all the commas from the C2 cell will be removed immediately and modified data pasted into the selected cell.
Step 3: See the result for the previously executed step. Here, you can see that we get the comma-free result after using this formula.
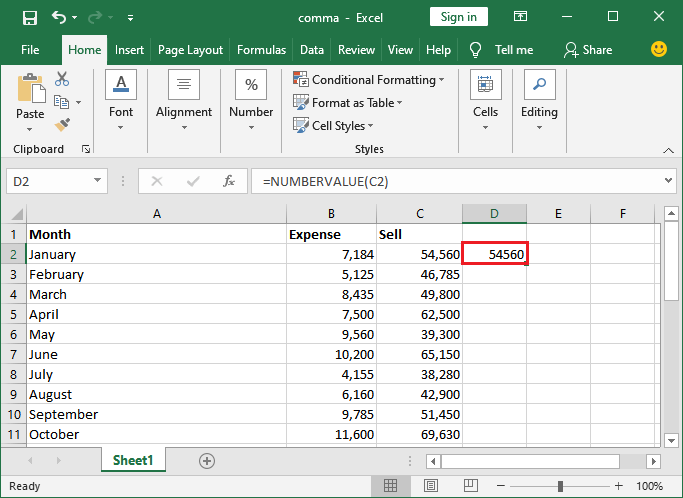
Step 4: Similarly, again execute the same process for another cell data like for C3 cell and press Enter key. You have just to change the cell number accordingly from which respective cell you want to remove the comma. For Example – pass C3 in this function.
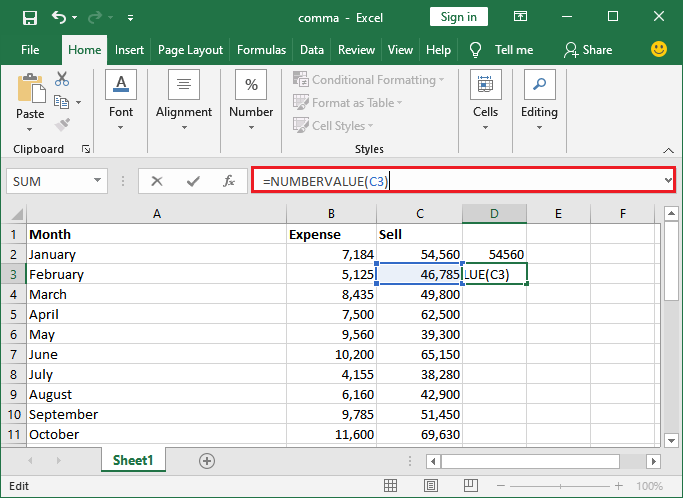
Do not forget to select the cell where you want to paste new modified data.
Step 5: You can see that another cell data has been modified successfully.
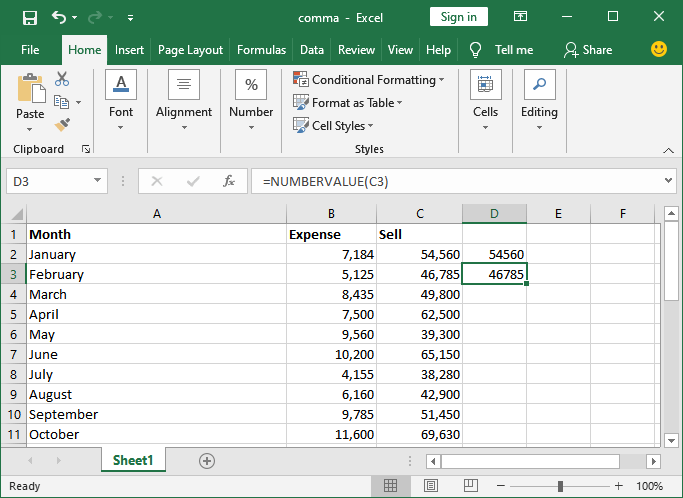
Likewise, the same process can be done with all cells of the Excel sheet bypassing the cell number in the NUMBERVALUE() function.
Note that NUMBERVALUE() does not work well if you want to remove all commas from number. It takes a lot of time of users. We will suggest you use first method (Number formatting method) to remove all commas from the numbers in an Excel spreadsheet at once.


