Value Error in Excel
Excel is one of the popular and most powerful spreadsheet programs. It helps us record large data sets within cells across various sheets and apply the functions and formulas accordingly. When working with functions or formulas, it is very common to come across some random codes instead of the expected results. The codes may differ in different cases, and the sheet may have one or more of these codes. Such random codes are known as Excel Errors, and each code has its description and way of fixing. The #VALUE is one such error in Excel that may appear in our Excel sheet for certain reasons.

This tutorial discusses the #VALUE error and how to find and fix this type of error in the sheet. Relevant example cases are also included in the tutorial to help us understand the concept clearly.
What is #VALUE Error in Excel?
The #VALUE Error occurs for several reasons depending on the formula used in the sheet. However, this mainly happens when the value passed within the formula is not of the expected type. It means something is wrong with the data supplied or the cell we refer to. The #VALUE error usually appears for one of the following reasons:
- Text is supplied in Numerical or Arithmetic Operations
- The cell has hidden or extra spaces
- The date is used as a Text
- An array formula is not closed properly
In simple words, the #VALUE Error occurs because of human mistakes. Fixing a #VALUE Error is usually just a matter of entering the right kind of value.
How to find #VALUE Error in Excel?
The #VALUE Error is very common, and finding this error is quite easy. However, finding the exact cause of this error sometimes may become difficult. We can use Excel’s ‘Go-To Special’ tool to find #VALUE errors within the sheet. To use this tool for finding the #VALUE Error, we must perform the following steps:
- First, we need to select the specific worksheet in the Excel workbook.
- Next, we must navigate the Home tab and click the drop-down arrow associated with the option ‘Find & Select‘. After that, we need to select the ‘Go-To Special‘ option from the list. This will open the ‘Go-To Special’ window.

- In the next window, we must apply the checkmark in a box associated with ‘Errors‘ under the Formulas and click the OK We must untick all other boxes under formulas, as shown below:

This will display cells with errors, including the #VALUE Error.
We can search the entire sheet using the above steps for the applied formulas that return an error. Once the respective error is found, we can find the cause and try some methods to fix it.
How to fix #VALUE Error in Excel?
Errors are very common in Excel when working with vast amounts of data and using functions or formulas while referring to certain sheet cells. However, finding and fixing the errors in Excel makes us perfect for working in Excel. When we need to fix the #VALUE Error, we must be aware of the cause so that it will be easy to fix this error.
Locate the Source/Cause of Error
In some cases, we can locate the #VALUE Error with its cause by evaluating the formula in the sheet. The Evaluate Formula tool helps us examine the found error and display the specific result accordingly. With the Evaluation Formulas window, we can examine each formula applied to the sheet and look for common and hidden spaces or other mistakes in them, which can lead to the #VALUE error. To evaluate the formulas, we must go to the Formulas tab and click on the ‘Evaluate Formula‘ button.

In addition, we can also go to Formulas > Error Checking to find mistakes or errors in the applied formulas of the sheet. The error checking window also tells us about the cell containing the error and the reason for the corresponding error. Furthermore, we can edit the formula and fix the error directly from the Error Checking window.

It may be difficult to find and fix #VALUE Errors in Excel as a beginner. However, if we exactly know why this error usually appears, we can accordingly follow one of the below cases to encounter it immediately:
Case 1: When Text is used within the Numerical or Arithmetic Operations
Consider the following Excel sheet where the marks of the students are recorded. We have applied the addition (+) operator to calculate the total marks for each student.
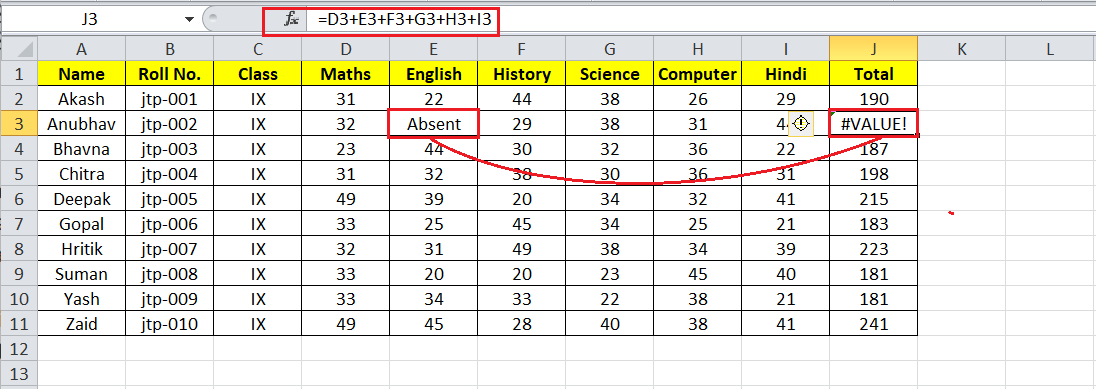
In the above sheet, we notice the #VALUE error in cell J3, where cells from D3 to I3 are added. The resulting cell (J3) returns the #VALUE error because one of the effective cells (E3) contains text (Absent) instead of a number. That means cell E3 contains the wrong data type, causing the #VALUE error.
To remove the #VALUE error from our sheet, we can change the text ‘Absent’ to number zero ‘0’.

In our case, we can also use the SUM function instead of the addition operator. This also helps remove the #VALUE error from our sheet. The typical arithmetic operators give an error when unsupported data is supplied. However, the SUM function ignores text values and provides the desired results.
In our example, we can apply the SUM function like this:
=SUM(D3:I3)
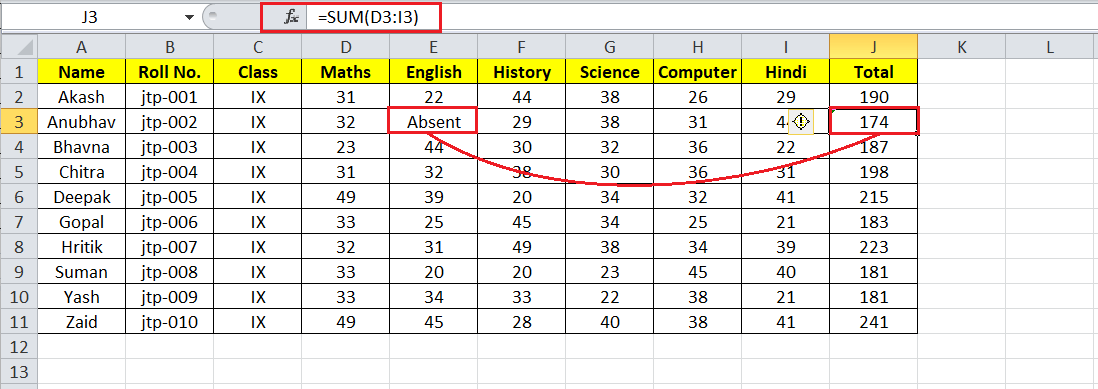
In the above sheet, we can notice that the SUM function has ignored the wrong data type in cell E3 and calculated the total values from the remaining cells. Fixing the #VALUE error for different functions differ from each other.
Case 2: When Cell contains Hidden or Extra Space with a Numerical Operator
If one or more cells contain spaces or hidden spaces and are used in formulas, the formula may return a #VALUE error. When a cell contains only space, the corresponding cell may look like a blank cell. However, Excel recognizes the space character and produces the #VALUE error. In Excel, blank cells are recognized as null or zero-value cells, and most formulas ignore such cells during calculations. But, this is not the case when the space character is used in a cell.
In the following Excel sheet, we notice the #VALUE error in cells J5, where cells from D5 to I5 are added using the addition (+) operator.
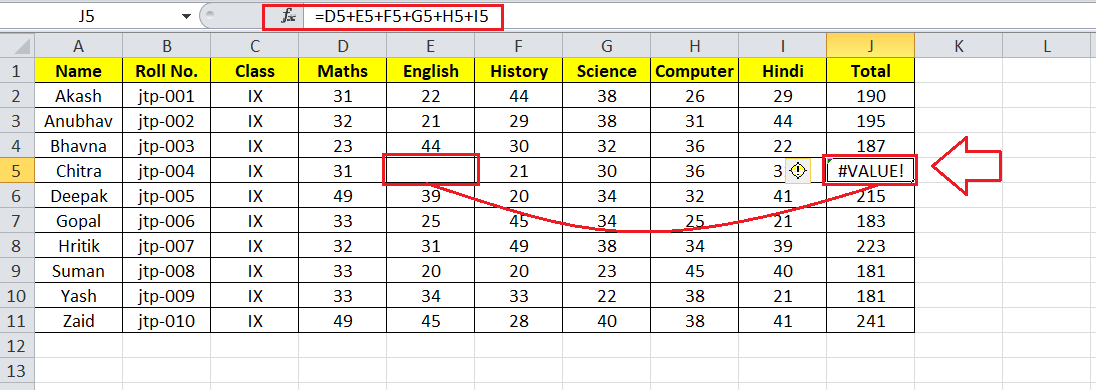
The resulting cell (J5) returns the #VALUE error because one of the effective cells (E5) contains the space character instead of a number. If we go to cell edit mode in cell E5, we notice that the cursor is not at the most-left side of the respective cell. In this case, cell E5 contains the wrong data type, causing the #VALUE error.
To remove the #VALUE error from our sheet, we can press the ‘Backspace’ key in the cell edit mode on cell E5. This will make the corresponding cell a blank, and the #VALUE error will be removed. Sometimes, there can be numerous cells with spaces or hidden spaces that may be difficult to spot and remove in this way. Therefore, we can follow the below steps to find and remove several spaces from our Excel sheet and fix the #VALUE error:
- First, we need to select the effective range of cells where we may need to find spaces.
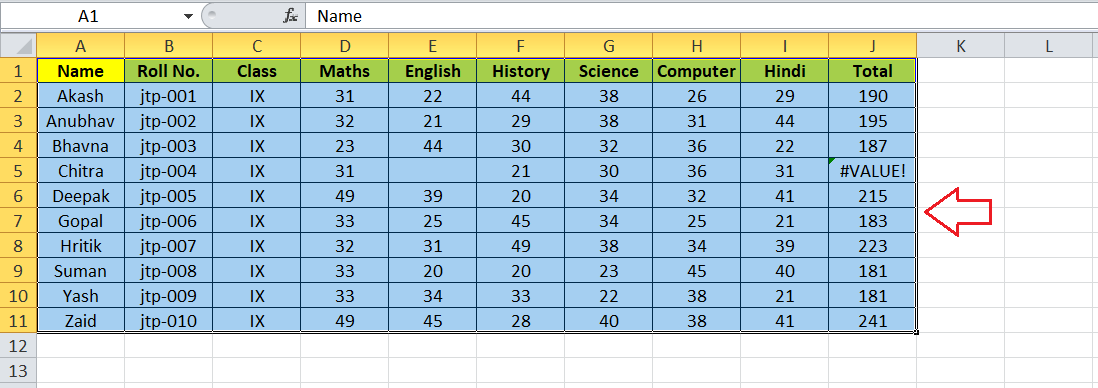
- Next, we must press the keyboard shortcut ‘Ctrl + F‘ to launch the ‘Find & Replace‘ dialogue box. In the dialogue box, we must select the ‘Replace‘ tab, as shown below:

- Under the Replace tab, we must type the ‘Space’ character next to the ‘Find what‘ box and keep the ‘Replace with‘ box empty. After adjusting the preferences, we must click the Replace All
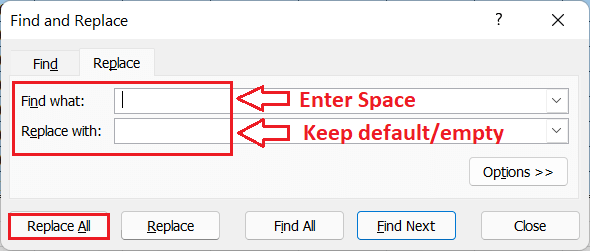 This will replace all the hidden spaces from the cells and make them entirely blank. Also, Excel displays the notification window that tells us how many changes have been made within the selected range. As soon as the spaces are removed, the #VALUE error (s) should also be removed accordingly.

Case 3: When the Date is recoded as Text
When we enter dates as the text in an Excel sheet, the #VALUE error occurs in the corresponding cells. In our example sheet, we enter start dates in column A durations in column B and add the start days to the durations in column C to get the corresponding project’s end dates.

In the above sheet, we can see #VALUE errors in cells C7 and C11. Values in cells A7 and A11 are entered as dates. However, Excel cannot read or recognize the values in cells A7 and A11 as dates used in formulas in cells C7 and C11. Decimal points separate the dates as delimiters in our example sheet. But, the default formats in Excel for dates use hyphens (-) to separate dates instead of decimal points (.).
To eliminate the #VALUE error from our sheet in this case, we need to replace the decimal points in cells A7 and A11 with hyphens. Although we can click on the respective cells and edit the dates to correct them, it will be a bit tricky when we have multiple cells to edit. To edit multiple cells to fix their dates, we can use the ‘Find and Replace’ tool in Excel.
We can perform the following steps:
- First, we need to select the cells where we want to edit the dates. In our case, we select the cells A7 and A11. We can click on each desired cell to select multiple cells while holding the Ctrl key on the keyboard.

- After selecting the cells, we need to launch the ‘Find and Replace‘ tool by pressing the keyboard shortcut ‘Ctrl + H‘. This will open the Find and Replace window.
- In the next window, we need to type decimal point (.) in the ‘Find what‘ box and type hyphen (-) in the ‘Replace with‘ box. After that, we must click the Replace All
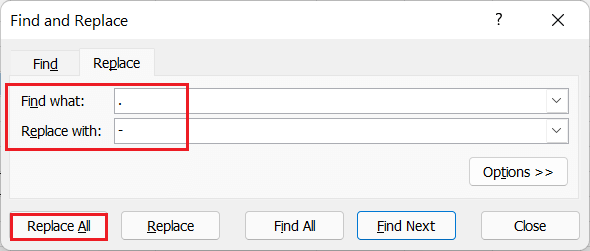
This will replace decimal points with the hyphen in all the selected cells (A7 and A11). After the values have been replaced, Excel will now read or recognize these values as dates, and our formulas will work as expected, fixing the #VALUE errors in respective cells.

Case 4: When the Array Formula is not closed properly
When we apply the Array formula in an Excel sheet, we must be very careful with the starting and end of the formula. Excel may return a #VALUE error if we don’t follow specific steps. In the following excel sheet, the array formula displays the #VALUE error.

To eliminate or remove the #VALUE error from our sheet, we must close the Array formula by pressing the keyboard shortcut ‘Ctrl + Shift + Enter‘ instead of the ‘Enter’ key. It is essential to note that the keyboard combination ‘Ctrl + Shift + Enter’ works well, and the applied formula is wrapped within the curly brackets.

Important Points to Remember
- It is better to use functions instead of arithmetic operations because functions often ignore text values and accordingly calculate them. This somewhat reduces the chances of #VALUE error.
- We can use the Error Checking tool to find the exact cause that may cause the #VALUE error in the sheet.
- To fix the #VALUE error caused by different functions require knowledge of the respective function and its syntax so that we can correct the values accordingly.


